

How To Change Time On Hp Laptop
Z7_3054ICK0KGTE30AQO5O3KA30N0
hp-concentra-wrapper-portlet
![]() Actions
Actions
HP PCs - Setting Time and Date, Clock Losing Time, Time and Date Incorrect (Windows 8)
This document pertains to HP and Compaq PCs and tablets with Windows 8.
The computer uses the date and time to identify when files are created, modified, or deleted; to manage email messages and catalog system restoration points; and to manage many other important system-related activities. This document provides instructions on how to change the date and time settings on the computer, how to enable Internet Time, and how to troubleshoot common computer clock issues.
The time and date are shown on the lock screen, and in the taskbar at the bottom right corner of the Windows desktop.
Figure : Time and date displayed in desktop taskbar

note:If you are not using the latest version of Windows 8, some graphics and information in this document may vary. You can get the latest version from the Microsoft Store.
Setting the date and time
Follow these steps to change the date and time settings.
-
Click the displayed time in the taskbar, and then click Change date and time settings.
Figure : Change date and time settings
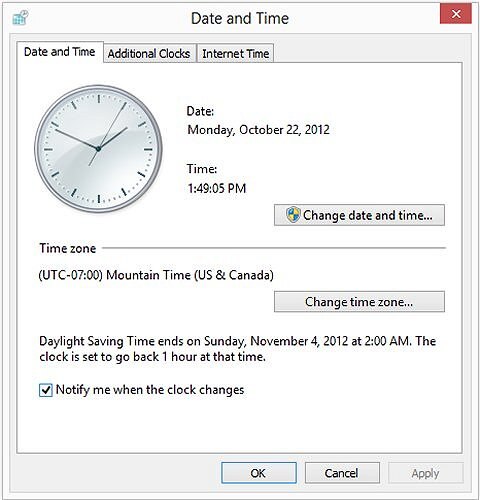
The Date and Time window appears.
-
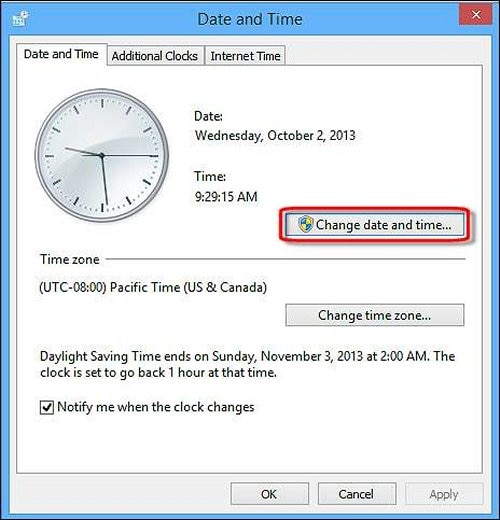
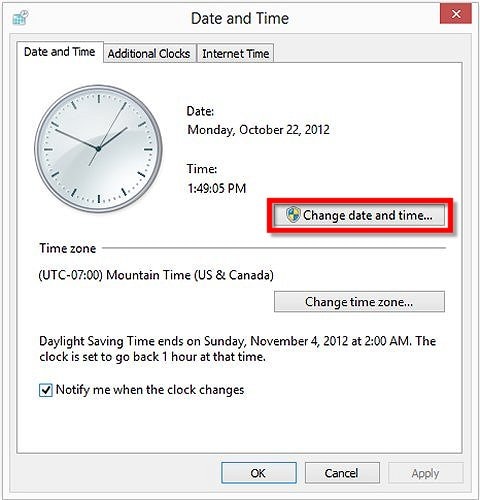
Click the Date and Time tab.
Figure : Date and Time
-
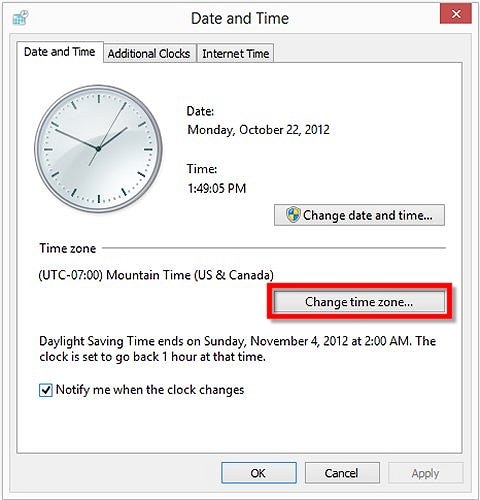
Click Change time zone.
Figure : Change time zone
-
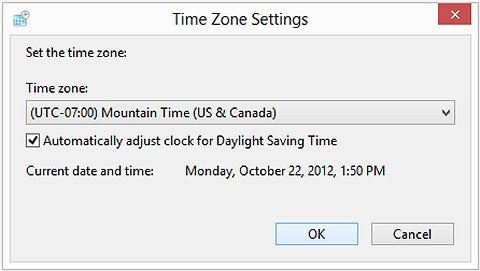
Make sure the correct time zone is selected. Place a checkmark next to Automatically adjust clock for Daylight Saving Time, if it is not already selected, and then click OK.
Figure : Time Zone Settings
-
Click Change date and time.
Figure : Change date and time
-
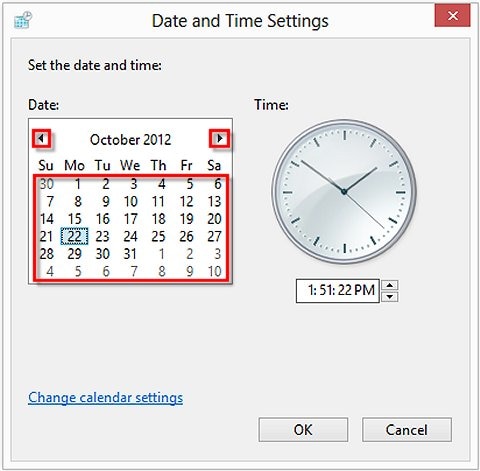
Click the small left and right arrows in the calendar to select a month and year, and then click a day within the month.
Figure : Date and Time Settings: Date
-
Change the time by entering the hour, minute, AM or PM, or by clicking the up down arrow buttons. Click OK when the time matches the current time.
Figure : Date and Time Settings: Time

The time zone, date, and time have been set.
Synchronizing time regularly with Internet Time server
Windows can automatically synchronize the date and time with a time server to make sure the accurate time is displayed. Follow these steps to enable Internet Time:
note:If your computer is part of a domain, the Internet Time feature is not available. Contact your System Administrator for clock synchronization information.
-
Click the displayed time in the taskbar and then click Change date and time settings.
Figure : Change date and time settings

The Date and Time window appears.
-
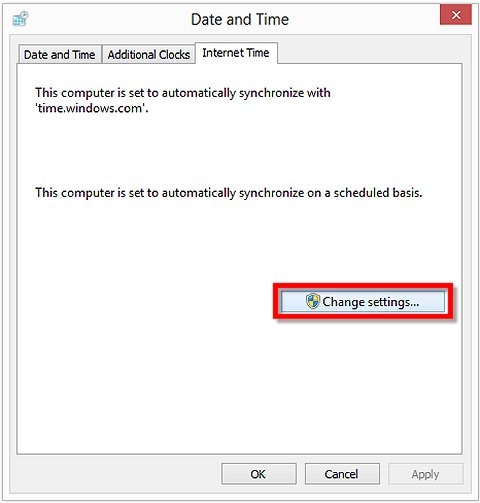
Click the Internet Time tab, and then click Change settings.
Figure : Internet Time tab: Change settings
If you are prompted for an Administrator password or confirmation, type the password or provide confirmation.
-
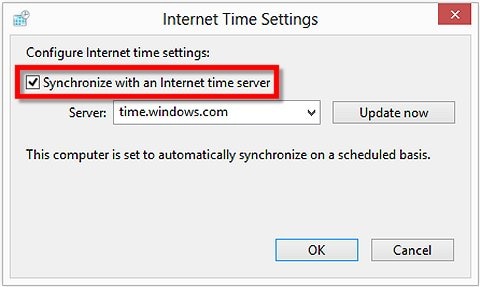
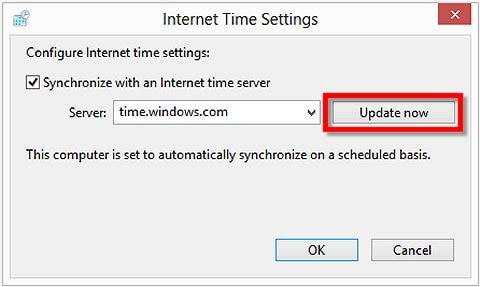
Make sure that Synchronize with an Internet Time server is checked.
Figure : Synchronize with an Internet Time server
-
Make sure the computer is connected to the Internet and click the Update Now button.
Figure : Update now
The computer connects to an Internet server and updates the time on the computer.
note:
If the computer fails to receive an update from the selected Internet Time server, a message opens stating that an error has occurred. Select a different server and try again.
-
Click OK.
Internet Time is now enabled on your computer.
Fixing computer clock issues
Computer clock issues can be caused by software, driver, or hardware problems.
Read a section below that matches your symptom or error, and follow the troubleshooting steps provided.
note:Troubleshooting computer clock issues can require restarting the computer or monitoring clock performance over time. HP recommends printing this document for future reference.
The computer clock loses time
If the time in Windows does not match the current time, or has to be reset often, use these steps to troubleshoot the problem.
Step 1: Disable or enable the Internet Time settings
Some computers can be configured to synchronize the computer clock to an Internet Time clock when the computer connects to the Internet. Synchronizing the computer clock with the Internet Time usually provides the most accurate method of keeping time and is normally recommended. However, in some cases, connecting to the Internet Time clock server may cause the computer clock to display the wrong time.
Complete the following actions to verify the correct time zone is set and to toggle the Internet Time setting to improve the accuracy of the computer clock.
-
Click the displayed time in the taskbar and then click Change date and time settings.
Figure : Change date and time settings
The Date and Time window appears.
-
Click the Date and Time tab.
Figure : Date and Time
-
Click Change time zone. Make sure the correct time zone is selected. Place a checkmark next to Automatically adjust clock for Daylight Saving Time if it is not already selected, and then click OK.
Figure : Time Zone Settings
-
Click the Internet Time tab, and then click Change settings.
note:
If your computer is part of a domain, the Internet Time feature is not available. If the Internet Time tab is not displayed, go to Step 2: Updating the BIOS to continue troubleshooting or contact your System Administrator.
Figure : Internet Time tab: Change settings
If you are prompted for an Administrator password or confirmation, type the password or provide confirmation.
-
Change the Synchronize with an Internet Time server setting.
Figure : Synchronize with an Internet Time server
-
If it is already checked, remove the check mark from the Synchronize with an Internet Time server option.
-
If it is not already checked, select the check mark on the Synchronize with an Internet Time server option.
-
-
Click OK, and then restart the computer:
-
Press the Windows
 + I key.
The Settings charm opens on the right edge of the screen.
-
Click Power, and select Restart.
Wait for the computer to restart and boot into Windows.
Monitor the computer clock to see if the problem continues. If the computer clock remains accurate, you are done. Otherwise, complete these steps again to reset the Internet Time setting back to its original condition, and then go to Step 2: Updating the BIOS.
-
Step 2: Updating the BIOS
If your computer has a BIOS update available, the update might fix problems causing your computer clock to display the incorrect time. For directions to find and update the BIOS, refer to the HP support document Updating the BIOS for desktop computers, or Updating the BIOS for notebook computers.
After updating the BIOS, monitor the computer clock to see if the problem continues. If the computer clock remains accurate, you are done. Otherwise, go to Step 3: Removing and reinstalling the Real-time clock to continue troubleshooting.
Step 3: Removing and reinstalling the Real-time clock in Windows 8
If you computer clock displays time inaccurately, try removing and reinstalling Real-time clock with the system operating in Safe Mode. Use the following steps to perform this task:
caution:Do not attempt to reinstall the Real-time clock in normal boot mode. System damage may occur.
-
At the Start screen, type device manager to open the Search charm, and then select Device Manager from the Search results list.
Figure : Device Manager

The Device Manager window opens.
-
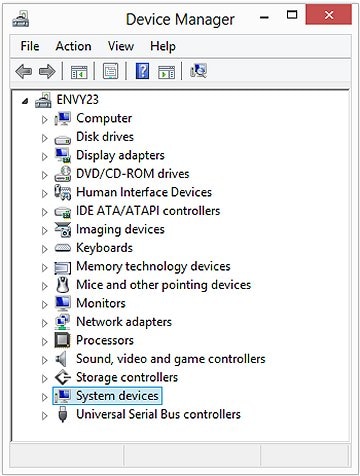
In the Device Manager window, double-click System devices.
Figure : System devices
-
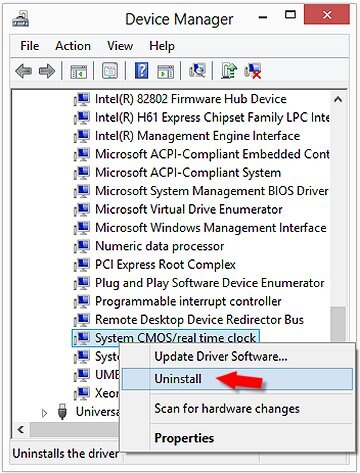
Right-click System CMOS/real time clock, click Uninstall, and then click OK in the Confirm Device Uninstall window.
Figure : Uninstall System CMOS/real time clock
-
When the System Settings Change window appears, click Yes to restart the computer.
Figure : System Settings Change
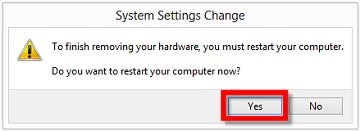
The real-time clock reinstalls automatically.
Error code: CMOS Time and Date Not Set
Computers contain an internal backup battery to keep time in the same manner as a watch keeps time. The internal battery is referred to as a CMOS or Real-Time Clock (RTC) battery. Computers rely on the internal backup battery to keep time when they are off. The internal CMOS or RTC backup battery should be replaced when it runs low on power.
When starting the computer, if your computer displays the error code CMOS Time and Date Not Set, the CMOS or RTC battery probably needs to be replaced. Follow the links and directions below, depending on your type of computer, to find information on replacing the CMOS or RTC in your computer.
- For HP TouchSmart, All-in-One (AiO), and notebook computers, complete the following actions:
-
Type your computer series name and the words real-time clock in the search field and press the Enter key.
For example, type HP Envy 15-3000 real-time clock to find a list of documents with information on the HP Envy 15-3000 series computer and real-time clock issues.
-
In the search results, look for a link to a document describing how to remove and replace the real-time clock or CMOS battery for your HP TouchSmart, AiO, or notebook computer series, and then click the link.
caution:
If you cannot find a document explaining how to remove and replace the CMOS or RTC battery for your specific computer series, do not attempt to replace the battery. Contact an Authorized Service Center for repair.
-
Follow the directions listed in the document to replace the CMOS or RTC battery.
System clock displays incorrect time after resuming from hibernation
On some computers, the system clock may stop or reset after the computer resumes from hibernation. Updating the BIOS might fix the problem. For directions to find and update the BIOS, refer to the HP support document Updating the BIOS for desktop computers, or Updating the BIOS for notebook computers.
How To Change Time On Hp Laptop
Source: https://support.hp.com/id-en/document/c03538442
Posted by: tarrythessaince.blogspot.com
0 Response to "How To Change Time On Hp Laptop"
Post a Comment